Showing posts with label Recipes. Show all posts

Monday, December 26, 2011

Creme Brulee with Chocolate


Jessie ready to begin!:-) (I love this photo of you, Jess!)

Little Ramekins we had to go to the store to buy.

Melt your chocolate like so.

The chocolate mixture goes in first. Then cool in the fridge.

Whip the egg.
Add the rest of the ingredients and whip some more.

Pour over the chocolate.
It looks so pretty!

Place in a baking dish half filled with water. Bake.
Cool. You can do a sugar glaze with a food torch. We tried a lighter and some brown
sugar but it didn't work. We did manage to catch the sugar on fire, though!

Lovely Creme Brulee.
Lovely Jessie!
Fantastic.

Monday, September 19, 2011

Grape Juice

We have LOTS of grapes this year in our garden. I made 7 pints of jelly on Friday, and today we made grape juice. It is more of a grape juice concentrate. We thought of it as we were straining juice from the grapes to make jelly. The juice was so thick and delicious! So instead of putting grapes into a jar with hot sugar water, we simmered the grapes on the stove for about 5 minutes, then strained the juice out. Put back in a pot, add sugar to taste, and pout into quart jars. Hot water bath for 15 minutes.

The sisters hard at work picking out the bad grapes (yes, worms do like grapes. It is very gross when you come across them:-P ) .
Andrea hard at work, washing up the dirty dishes (this is a typical afternoon at our house. Everyone doing their chores and being goofy!):
Joel making faces as he strains the grapes...

Simmering the juice just to heat it back up and melt the sugar.

Pretty grape juice next to the mums dad bought for my "mum":-)
We had 5 quarts survive. I lost 1 1/2 quarts due to the jars breaking as I was ladling in the juice.
I don't know why it happened, as I had the jars hot from the oven.
But it is not easy to clean up that much grape juice from the counters, stove, cupboards, and floor!


Banana Bread

A good friend of ours (who I babysit for!) shared this fabulous banana bread recipe with me. I made it with whole wheat flour, and it was still just as moist and yummy:-) But no nuts for us... I am the only one who likes them in desserts.

A cup of tea and a slice of bread is the perfect afternoon snack:-)

Banana Nut Loaf
2 cups flour
2 tsp. baking powder
3/4 tsp. salt
1/4 tsp. baking soda
1/2 cup butter, softened
1/2 cup sugar
2 eggs
1 tsp. finely shredded orange peel
2 ripe bananas, cut up (1 cup)
2 Tbsp. milk
1/2 cup chopped pecans or walnuts (optional)

Lightly grease a 9x5x3 loaf pan.
In a mixing bowl thoroughly stir together the flour, baking powder, salt, and soda.
In a mixing bowl cream butter and sugar until light and fluffy.
Add orange peel; beat well.
Mash bananas with a fork; stir in milk.
Add flour mixture and banana mixture
alternately to creamed mixture. Beat until smooth after each addition. Fold in nuts. Pour batter into pan, bake at 350° oven for 45-50 minutes.
When tooth pick comes out clean, it is done. Turn out and cool on a wire rack.
Enjoy!

Thursday, August 4, 2011

Cucumber appetizers

These are very yummy:-) We like to make them to serve for lunch. Great with some fresh fruit on the side!

Spread cream cheese on a Triscuit cracker. Top with a cucumber, and sprinkle on some lemon pepper. That's it! These are a very refreshing Summer time snack:-)

Preschool: Smoothies

You will need: All sorts of fruit. We used bananas, peaches, kiwi, and strawberries.
Cut it up like so:

Put the fruit into a blender.
Pour on some orange juice and about 1/3 cup of any flavor yogurt.
Turn on the blender to puree. After about 30 seconds, turn the blender off. Add about a cup of ice. Replace lid and puree until smooth and ice is fine.


Enjoy!

Tuesday, August 2, 2011

Spinach Pie

This fabulous lunch dish comes from "Lessons at Blackberry Inn" by: Karen Andreola. It is sooo delicious, and healthy too:-)
~Spinach Cheese Pie~
To make one 9-inch pie, you will need:
16 oz. Ricotta cheese
A large sprig of basil leaves - several handfuls washed, chopped, left raw
1 egg (I had to make it once without the egg, and it was fine just not as firm)
1/2 cup of freshly grated parmesan, romano, or asiago cheese
One bag of fresh baby spinach, rinsed well
1 tomato
Salt and pepper to taste
Butter to grease pie pan
(Optional) several sprigs of chopped green onion cooked until soft in olive oil and butter
(Optional) pie crust

Place the wet spinach leaves in a sauce pan and heat only until the leaves wilt. When cool. squeeze out excess water and chop. (A package of frozen chopped spinach, thawed and squeezed, works too. My primitive method is to let the water run through my fingers as I squeeze the frozen spinach one handful at a time.)
Preheat oven to 350° F. In a large mixing bowl crack egg, add salt and pepper. Mix thoroughly with ricotta.
Fold in basil, grated hard cheese, green onion, and lastly, the chopped spinach. Spoon mixture into a greased pie pan. Decorate on top with thin slices of tomato.
Bake in oven for 20-25 minutes. Serve with salad and crusty bread.


This is easy to put together on a busy homeschool day, for a nice hot lunch. Also elegant enough to serve as a special lunch for guests. Enjoy!

Friday, July 22, 2011

Bread and Butter Pickles ~ A tutorial


I just made a big batch of pickles on Sunday, and decided to document the process so I could share a tutorial for anyone interested. I am no seasoned canner - this is only my 4th year of canning anything on my own! But here is the recipe that we really enjoy.
Begin by picking your cucumbers...:-)
When you have allot (more then you could possibly eat raw right now)...then it is time to make pickles!!
Bread and Butter Pickles ~ A tutorial
This recipe says it makes 7 pints. I made this recipe about 3 1/2 times over.

Slice your cucumbers. You will need 4 quarts of cucumber slices per batch. Place slices in a large bowl.


Slice 8 medium white onions (2 1/2 pounds) and put with the cucumber slices. Cut in half 3 cloves of garlic (a clove is one piece from the bulb) and add to cucumbers. Next sprinkle 1/3 cup pickling salt on top, and mix well.
Cover with about 2 inches of cracked ice and refrigerate for 3 hours (I did not have exactly 2 inches of ice, but roughly).
When you have about 45 minutes to go before the 3 hours is up, fill your canning pot about 1/2 way or a little more with water, and put on to boil. Wash out your canning jars in hot soapy water, and rinse. Check for any chips on the rim (do not use chipped jars). Place upside down in the oven, and turn oven on to bake and 200° F. This is how you sterilize your canning jars.

Place your lids (the flat part) and rings in a low pan and cover with boiling water for about 10 minutes. Leave in the hot water as you are canning. You CANNOT reuse the flat lids as the seal only seals once, however the rings you can reuse for several years!

Okay, now it's time to make your pickle brine. You will need:
4 cups sugar (I do 3 or 3 1/2 cups)
3 cups apple cider vinegar
2 Tablespoons mustard seed
1 1/2 teaspoons tumeric
1 1/2 teaspoons celery seed

Mix in a large pot on the stove (you don't have to heat this mixture quite yet).
Drain your cucumbers, and pick out as much of the ice that is still frozen as you can. Recipe says to remove garlic... we like it in!
Add cucumber Mixture. Bring to a boil, and turn off.
Carefully remove a steril jar from the oven (oven mitts are quite useful!). Place your funnel on the jar.
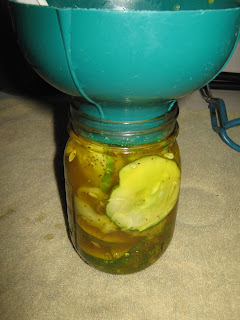
Use a ladle to fill the jar with pickles and brine with 1/2 inch "head space" at the top.
Remove air bubbles by poking a plastic knife in the jar a few times around the pickles.

Use a wet paper towel to wipe the rim of the jar clean (incase any of the brine got on it).
Carefully remove a lid and ring from the hot water (you can buy a special magnet wand that is very helpful for this step!). Place the lid on the jar, and secure with a ring.
After you have done this to seven jars, place the jars in your canning rack, and carefully lower rack into your canner of boiling water. Make sure the water covers the jars. I usually keep a kettle of boiling water handy to pour on top, just in case it's not enough to cover the jars.
Once the water comes to a boil again, set your timer for 10 minute for 1/2 pints and pints, 20 minutes for quarts.

When done, CAREFULLY remove the rack of jars (oven mitts!). Repeat process if you are making multiple batches.

Place the jars on a towel to cool. When cool, you can write the date and contents on the lid.

Now wait for the satisfying sound of "pop" as the jars seal:-) Before storing, check to make sure the little "button" on top of each lid has gone down. If any of the jars did not seal, refrigerate those jars and enjoy them sooner:-)
Now the fun part... stand back, and admire your hard work!:-) And imagine opening jars of pickles all year long!

This batch I made 3 quarts, 17 pints, and 2 half pints of pickles.